Re-building the Dewdrop
This is the story of the "Dewdrop" (previously "Kathleen-Charlotte"). She's a Wooden Silhouette MK II, designed by Robert Tucker and built by Hurley Yachts of Plymouth in 1960. She was literally saved from the bonfire November 2006 and was given to me as a project. PLEASE READ FROM THE BOTTOM UP and feel free to leave comments!(More info on Silhouette's can be found at www.soia.org.uk) ***PLEASE READ FROM THE BOTTOM OF THE BLOG UPWARDS!***
Thursday, March 29, 2007
Using templates


I really do find the use of templates is a massive help. I use cheap thin ply, hardboard or whatever I can get my hands on.
I just fiddle around with it until I get it absolutely right then use it as a guide for cutting out the more expensive marine ply.
If I get the template wrong I just set it aside for use on a smaller job and start again!
Here, I'm using some thin ply for fabricating the starboard cockpit coamings. As I found with the large Hull templates, they're not symmetrical, so a little "creative adjustment" is required!
Fitting the windows


It's important to pilot-drill all the srcrew holes with a very fine drill, taking care not to go all the way through. I used 2.0mm for the job. This prevents the wood from splitting when you put the screw in. It also gives the screw a good true guide to follow which is important when using large dome-headed screws.
I found that if you put four "key" screws in first it holds the Perspex to enable you to drill all the other holes without fear of slippage.
Great care and patience was called for here!
Wednesday, March 21, 2007
Tuesday, March 20, 2007
Let's not get carried away...............

Things are looking good now and it's so easy to head off in several different directions (I learnt this early on!).
Once I've sorted out the starboard cabin side and coaming, I dismantle everything and have a dedicated glueing session.
This means I'm not messing about mixing small quantities of glue and I don't get so far ahead that I forget things.
Takes a lot of discipline though...............................
Double Thickness


As per the original plans, the cockpit coamings are double the thickness of the cabin sides i.e. 18mm. I made up an exact template of very thin cheap grade ply and used this to cut the two coamings exactly to size.
They'll be laminated together in-situ to hold their shape. I've left the after ends a bit long as they'll need to be trimmed to fit the rear coaming.
Monday, March 19, 2007
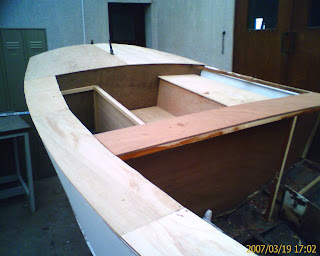
New Bridge-Deck


I got he cockpit floorboards finished today. All that remains is to fit four brass lift-rings for access to the stowage beneath. (and paint of course).
I also fitted the new Bridge-Deck. I've still got to adjust the ends once the coamings go on, but as you can see from the picture it'll look great when it's varnished up.
I used 12mm ply for the floorboards and they remain a loose fit to allow easy access to the cockpit bilge/stowage space.
For the Bridge-Deck I cut a piece of 9mm ply out of the same sheet as the bulkhead. This will be glued and tacked into place.
Thursday, March 15, 2007
Monday, March 12, 2007
Glassy Finish!


Finished varnishing the mast today. With a little bit of effort and lots of preparation you can achieve an excellent finish.
It's worth removing all fittings if possible as this gives a more even coat and protects the wood under the fittings.
I applied 3 coats of professional grade varnish, leaving each coat at least overnight. I rubbed each coat down with very fine sand paper and cleaned it off with white spirit before applying the next coat.
I found it very therapuitc, and if you get the preparation right, you get a fantastic result.......


